Installation Guide
Quick start: See the Quick Start Guide for a 5-minute setup overview.
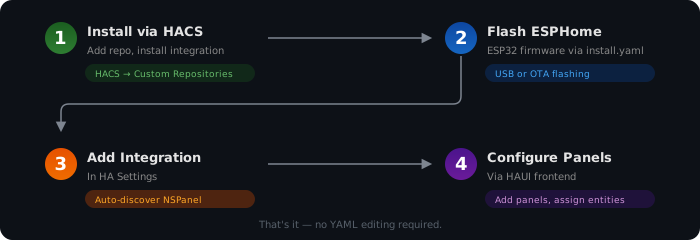
Requirements
HomeAssistant needs to provide following applications:
- ESPHome
- Hub (nspanel_haui custom integration)
Please install all requirements before continuing.
1. Step: Preparations
It is necessary to flash the panel once with ESPHome.
To be able to flash the panel the first time the device needs to be opened and connected via a USB-UART-Adapter.
For disassembly and connection details, see the NSPanel teardown guide.
When connecting the USB-UART adapter, connect GND to IO0 to put the device in flashing mode.
2. Step: Install ESPHome
With the prepared and connected device it is now possible to install ESPHome on it.
-
Get the config: Use
esphome/install.yamlfrom this repository as a starting point. Copy its content into the ESPHome dashboard and adjust the values. -
Create a new device: In the ESPHome dashboard, create a new device. Set the device name to your chosen hostname (default:
nspanel-haui). Store the generated OTA password and API encryption key. -
Edit configuration: Replace the generated config with the content from
esphome/install.yaml. Only the substitution values need editing: name— host and device namewifi_ssid/wifi_password— Wi-Fi credentialsweb_username/web_password— web access credentialsota_password/api_encryption_key— from step 2
You can set these directly in the file or use a secrets.yaml file.
-
Install: Click "Install" and select either "Plug into this computer" (if connected via USB and your browser supports WebSerial) or "Manual download" to get
nspanel_haui.bin. -
Alternative — Flash via web: Open web.esphome.io, load
nspanel_haui.bin, and click Install. When finished, disconnect the USB-UART adapter and reassemble the panel.
3. Step: Install Hub App
Install the NSPanel HAUI integration via HACS (recommended) or by copying custom_components/nspanel_haui/ into your Home Assistant custom_components/ directory, then restart Home Assistant.
This needs to be done only once. After restart, add the integration via Settings → Devices & Services → Add Integration → NSPanel HAUI.
4. Step: Configuration for Hub
The Hub app is configured through the Home Assistant UI via the NSPanel HAUI integration's config flow and panel editor. No manual configuration.yaml editing is needed.
See Configuration Details for all available options and the FAQ for common questions.
5. Step: Install TFT File
The display needs a custom interface which is provided in a TFT file. The file will automatically be installed on the display when the Device connects to the Hub App.
The installation process can also be executed manually. See Nextion Display for details.
Finished
To install more devices just use unique names. The process remains the same for multiple devices.
See Documentation for more details.